Today I’m sharing several ideas on how to cook for survival without power. If we lose power for a day or two we can eat peanut butter and jelly sandwiches, or chicken salad on crackers for that matter. We can eat some freeze dried veggies out of our #10 cans or open a can of green beans and eat them. Here’s how I see what will happen after a week of zero power or utility breakdown. Yes, we have flashlights and batteries to get us through the evenings of darkness. Maybe you have a lantern or two. I just finished reading Ted Koppel’s book, “Lights Out”. Lights Out: A Cyberattack, A Nation Unprepared, Surviving the Aftermath
You may have heard this statement from me before, the first day without power we will check with our neighbors to see if they have lost power too. Hopefully, we all have a way to charge our cell phones or laptops if the power outage is only in our neighborhood. If it’s only our neighborhood we can use our cell phones to see what’s going on in the world. If the cell phones don’t work then possibly it’s a total grid down. The second day without power we can still play cards, board games and visit with neighbors to see what plan B is if this power outage is longer than two days. Now, during this power outage, the supermarkets will probably be without power and therefore, they will be closed once the generator runs out of fuel. The third day and every day thereafter some people may become agitated. The gas stations will be shut down because of zero power. Uncertainty brings fear and emotions may be high. If you are prepared you will not be afraid.
I strongly suggest you buy the paperback copy of my book now before you need it. If you have zero power you can flip through the pages to be ready for what may be coming. Please study it and read it as a family. When I wrote the book I told my publisher I did not want to write about weapons in my book. I wanted my book to be family friendly so that a child old enough to read could study it and learn from it. It’s available in many stores and online. I feel blessed to have been asked to write my book to teach the world in paper form to be prepared for the unexpected. Prepare Your Family for Survival: How to Be Ready for Any Emergency or Disaster Situation

We all know we need water to survive, so I highly recommend storing water first, then food. Now let’s get into cooking without power. We can eat cold meals out of cans or food from our gardens for a week if we had too, but if we are out of power for much longer than that we need to know how to cook outside. I have several options for how to cook for survival. These are the ones I highly recommend and use all the time.
Cook For Survival
Keep in mind you need to store some matches, a butane lighter or a fire starter tool for some of the cooking stoves below. I also recommend this tool: Lodge A5-1 Charcoal Chimney Starter

1. Dutch Ovens
If you can find one at a thrift store that would be awesome, although they are getting harder to find now. This is the one I recommend because it has a lid with a “lip” so you can not only place charcoal underneath the oven itself, but also on the lid. Another bonus is you can stack this style of Dutch oven. Lodge Camp Dutch Oven, 6 Qt
Fuel:
I am only talking about cooking outside today, so let’s talk about the fuel we can use outside with cast iron skillets, griddles or Dutch ovens. I have actually put charcoal on the ground and baked bread, casseroles, biscuits or whatever just on rocks with charcoal. I store my charcoal without the starter chemicals (plain charcoal will store indefinitely if kept airtight and dry) in 5-gallon buckets with Gamma Lids. Now, you can cook with cast iron on your gas barbecue or over a fire pit with a tripod like this one: Lodge 3TP2 Camp Dutch Oven Tripod

Charcoal, lump charcoal, and wood work great in a fire pit or on gravel.
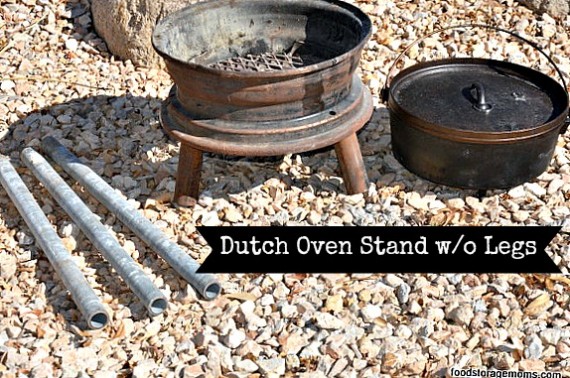
Dutch Oven Stand Without Legs Attached
My awesome brother-in-law, Duane made for Mark and me this portable Dutch Oven stand so we can take the 24-inch legs out and travel in a car or truck easily with this little barbecue. It’s really easy to store in the garage because it comes apart. It is extremely sturdy. Duane took a tire rim that is approximately 15 inches wide in diameter. He welded 3 short legs, about 6 inches tall and about 1-3/8 inches in diameter, inside the rim. The other legs are 24 inches long and 1-1/4 inches in diameter and fit inside the welded ones attached to the tire rim. He cut a metal grate and welded it so it is stationary inside the tire rim to hold briquettes or firewood. If you had another grate/grill for the top you could barbecue on it. We use this mainly for the Dutch Oven, or sometimes we roast marshmallows or hot dogs with a skewer over the flames.
What I really like about this unit is that you can use it with or without the 24-inch extended legs. Of course, you would need to know someone who knows how to weld and has welding tools. Thank you to my brilliant brother-in-law for coming up with this great idea! The extended legs are about 24 inches long by 1-1/4 inches in diameter. This makes me want to cook something this weekend in my Dutch Oven!
2. Butane Stoves
I actually used one of these butane stoves for three months last year when I was waiting to have a gas line installed in my kitchen Camp Chef Butane 1 Burner Stove with Camping Case

Fuel:
What’s the deal with butane canisters? You will read that you can only use these butane stoves outside, but I have used them in stores that provided them for me to show how to cook inside their facilities. If use them in my home I crack a window open. These are great to cook outside, but they are small and will work great for a few weeks.
3. Kelly Kettle
I love the Kelly Kettle because it’s fairly inexpensive and uses very little fuel. You can boil water to make soup in minutes. If you want to see how a Kelly Kettle works on a step by step basis here is a post where I show how to use it: Kelly Kettle by Food Storage Moms. I wanted one for several years and I was so grateful my friend Glen from Kelly Kettle asked me to show the world how to use one! These are great for camping and emergencies because they use very little fuel. Literally. This is the one I have: Kelly Kettle Ultimate Stainless Steel Small Trekker Camp Stove Kit. New Spot Welded Model. The Perfect Camp Stove for Cooking, Hiking, Camping, Kayaking, Fishing, and Hunting. Boil Water, Cook Fast, Survive.

Fuel:
Dry leaves or twigs, that’s it! I have used pine cones as well. I call this my FREE fuel stove because you can gather the dry leaves, pine cones or twigs around your yard, add a match and you have water boiling in no time at all.
4. Volcano Stove
Volcano stoves are awesome because you can use three types of fuel with them. The Volcano Stove collapses to about 5 inches and fits well in a car or on a shelf in your garage. I comes complete with a zippered bag. Volcano 3 Collapsible Cook Stove
Fuel:
Wood, charcoal, lump charcoal and propane canisters, large and small are all great options. Please note not all Volcano stoves come with BOTH adapters for the small propane canisters AND large propane tanks. This is why it’s critical to practice and use our emergency or camping outdoor stoves before a disaster or unforeseen emergency.
5. Camp Chef-Stove/Oven Combo
I love this one because you can bake bread or casseroles in it, AND it has two burners on top. If you watch at your local Costco or Sam’s Club they usually have these for a good price right before Memorial Day or Father’s Day. Here’s the one I have: Camp Chef Camping Outdoor Oven with 2 Burner Camping Stove
Fuel:
Propane canisters or tanks. You will need BOTH the small propane canisters and large propane tank adapters to use them. I only use the large adapter because I prefer to use my propane tanks. I do have both adapters, though. Please be aware they do not always provide both adapters when purchased.
6. Camp Chef Double Burner Stove
This is the one I use all the time. It’s very sturdy and I can cook with my cast iron pans and Dutch ovens on it. Camp Chef Explorer Series EX-60LW 2-Burner Modular Cooking System, Black
Fuel:
Propane.
Sun Oven:
If you purchase a Sun Oven I only recommend this brand: All American Sun Oven Dehydrating and Preparedness Accessory Package
Fuel:
Zero fuel, you only need sunshine. Here’s the deal, I recommend these only as a second choice for cooking. I have two of them and use them all the time. Where I live I get the best sunshine between 10:00 a.m. and 2:00 p.m. I’m just giving you the heads up here, you can’t come home from work at 4:00 p,m. and still have enough sunshine to bake a meal or bread where I live. If we happen to be without sunshine for two or three weeks we will need an alternative way to cook or bake our meals. I must add something here that’s very important about the Sun Oven. We need ZERO fuel, that’s a big deal to me. I will prepare meals planned around use of the sun rather than use up my wood, charcoal, lump charcoal, pinecones, butane or propane fuel.
I hope that my post gives you several ideas that may work for your family. All you need to cook for survival is to have one or two types of stoves, or just charcoal with a Dutch oven. Easy peasy to be prepared for the unexpected.
Readers:
TR: You can stack bricks & put BBQ grill on top to set pots on, burn wood underneath on flat bricks. Bow saw, hatchet, axe. Matches, bics, zippos using Coleman white gas.

The post How To Cook For Survival Without Power appeared first on Food Storage Moms.